DIY Taupunktlüftung mit Home Assistant & Node-RED zur Kellerfeuchtigkeitskontrolle
Home automation project

Inhaltsverzeichnis
Have questions?
Feuchtigkeit smart in Schach halten: Diese Anleitung zeigt, wie man ein vollautomatisches Taupunkt-Lüftungssystem mit Home Assistant und Node-RED einrichtet. Dafür werden Innen- und Außentaupunkt verglichen und nur dann “gelüftet”, wenn die Außenluft tatsächlich Feuchtigkeit aus dem Inneren aufnehmen kann. Das spart Energie und beugt Schimmelbildung vor, insbesondere in Kellern oder Hauswirtschaftsräumen.
Was ist eine Taupunktlüftung?
Taupunkt-Lüftungssysteme automatisieren die Frischluftzufuhr und Abluft auf Basis physikalischer Feuchtigkeitsprinzipien, anstatt Ventilatoren einfach nur nach Zeitplan laufen zu lassen. Sie analysieren Temperatur und relative Luftfeuchtigkeit, um den Taupunkt zu berechnen (die Temperatur, bei der Kondensation auftritt). Wenn die Außenluft mehr Feuchtigkeit aufnehmen kann (d.h. ihr Taupunkt deutlich niedriger ist als drinnen), reduziert das Lüften die Luftfeuchtigkeit im Innenraum auf natürliche Weise.
Luftentfeuchter verbrauchen mehr Strom, benötigen eine Entwässerung, verursachen Lärm und skalieren schlecht bei mehreren Räumen. Ein taupunktgesteuertes Lüftungssystem:
- Ist kostengünstiger in Betrieb und Anschaffung
- Skaliert über mehrere Räum hinweg
- Passt sich automatisch an die Feuchtigkeitsbedingungen an
- Lässt sich mit Anwesenheit, Türen, Schaltern oder Zeitfenstern integrieren
Wenn die Außenluft zu feucht ist (z. B. an einem regnerischen Sommertag), pausiert das System einfach.
Luftentfeuchter haben trotzdem ihre Berechtigung, z. B. in Räumen ohne Fenster, Wohnungen in denen keine Ventilatoren installiert werden können (Mietwohnungen) oder in extrem feuchten Klimazonen, wo die Außenluft selten trocken genug ist. Sie sind auch nützlich als Ergänzung zu einem Taupunktlüftungssystem, um Spitzenfeuchtigkeitswerte zu kontrollieren.
Benötigte Materialien
- Eine Home Assistant Instanz
- Temperatur- + Luftfeuchtigkeitssensor (innen)
- Temperatur- + Luftfeuchtigkeitssensor (außen)
- 2–4 Lüfter (am besten für Dauerbetrieb ausgelegt)
- Smarte Steckdosen oder smarte Relais (kompatibel mit HA, optionale Energiemessung)
Optionale Upgrades: Türsensor, Wandschalter, zusätzliche Raumsensoren
Einrichtung
Schritt 1: Sensoren platzieren
Mindestens ein Innensensor sollte im Zielraum (wo die Luftfeuchtigkeit gesenkt werden soll) platziert werden sowie ein Außensensor der vor direkter Sonneneinstrahlung und Regen geschützt installiert werden.
Alle Sensoren müssen die Daten möglichst direkt an Home Assistant melden.
Wenn die Sensoren oder Integrationen bereits Taupunktwerte liefern, kann dieser nächste Abschnitt übersprungen werden.
Template-Sensoren in der Datei configuration.yaml erstellen. Dabei darauf achten, sensor.humidity / sensor.temperature durch die tatsächlichen Entity-IDs zu ersetzen und Home Assistant neu zu starten. Die unit_of_measurement anpassen, falls Fahrenheit verwendet wird. Es gibt auch fertige Integrationen/ Add-ons, die Taupunktwerte bereitstellen. Dazu am besten recherchieren was gerade aktuell ist.
sensor:
   - platform: template
      sensors:
         dewpoint_inside:
            friendly_name: "Dewpoint Inside"
            value_template: >-
               {% set H = states('sensor.humidity') | float(default=0) %}
               {% set T = states('sensor.temperature') | float(default=0) %}
               {% set b = 18.678 %}
               {% set c = 257.14 %}
               {% set d = 234.5 %}
               {% set gamma = log(H / 100 * e ** ((b - T / d) * (T / (c + T)))) %}
               {% set Tdp = ((c * gamma / (b - gamma))) | round(2) %}
               {{ Tdp | float | round(1) }}
            unit_of_measurement: "°C"
         dewpoint_outside:
            friendly_name: "Dewpoint Outside"
            value_template: >-
               {% set H = states('sensor.humidity_outside') | float(default=0) %}
               {% set T = states('sensor.temperature_outside') | float(default=0) %}
               {% set b = 18.678 %}
               {% set c = 257.14 %}
               {% set d = 234.5 %}
               {% set gamma = log(H / 100 * e ** ((b - T / d) * (T / (c + T)))) %}
               {% set Tdp = ((c * gamma / (b - gamma))) | round(2) %}
               {{ Tdp | float | round(1) }}
            unit_of_measurement: "°C"
Schritt 2: Lüfter auswählen & montieren
Ich empfehle Lüfter, die für den Dauerbetrieb ausgelegt sind (z. B. leise Rohrventilatoren oder hochwertige PC-Lüfter mit 120–140 mm). Dabei sollten am besten eine Zuluft- und eine Abluftquelle bestehen, um einen Luftstrom zu bilden. Für Keller eignen sich Plexiglas-Fenstereinsätze oder bestehende Wandöffnungen gut.
Die Montagerichtung ist wichtig: Achte darauf, dass Laufpaare in entgegengesetzte Richtungen blasen (zwei rein, zwei raus, falls vier verwendet werden). Dichte die Ränder ab, um Zugluft zu vermeiden.
Schritt 3: Smarte Steuerungs-Hardware
Verwende smarte Steckdosen oder Relais, die sich in Home Assistant integrieren lassen. Die Energiemessung ist optional.
Benene die Entitäten klar und verständlich (z. B. switch.basement_fan_intake_1). Eine konsistente Benennung beschleunigt die Zuordnung in Node-RED.
Schritt 5: Home Assistant Einrichtung
Erstelle für jeden Raum eine input_number (als Schwellenwert), um festzulegen, welche Taupunktdifferenz präferiert wird, bevor gelüftet wird. Beispielwerte: 1,5–3,5 °C. Ein höherer Wert führt zu weniger, dafür effektiveren Lüftungszyklen.
Installiere das offizielle Node-RED Add-on und füge diese Extra-Nodes für die Logik hinzu:
Schritt 6: Node-RED Automatisierungs-Flows
Lade die Vorlage herunter und importiere sie in Node-RED.
Node-RED Template herunterladenNach dem Import:
- Dupliziere eine Vorlagengruppe für jeden Raum.
- Bearbeite jede Home Assistant Node: Setze die korrekten Entity-IDs und den HA-Server.
- Verbinde jede Gruppe mit der Trigger-Kette.
- Führe ein Deploy durch und achte auf den Debugger-Output für den ersten Zyklus.
Trigger-Logik
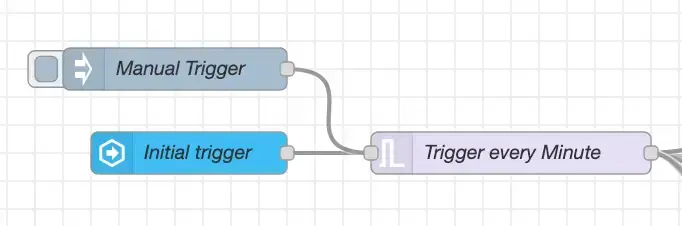
Das Trigger-Subsystem triggert initial einmalig, sobald HA verfügbar ist, und prüft dann alle 60 Sekunden (einstellbar). Kürzere Intervalle = schnellere Reaktion, jedoch mehr Statuswechsel. 60 Sekunden sind ein guter Kompromiss;
Einfacher Flow (Kernentscheidung)
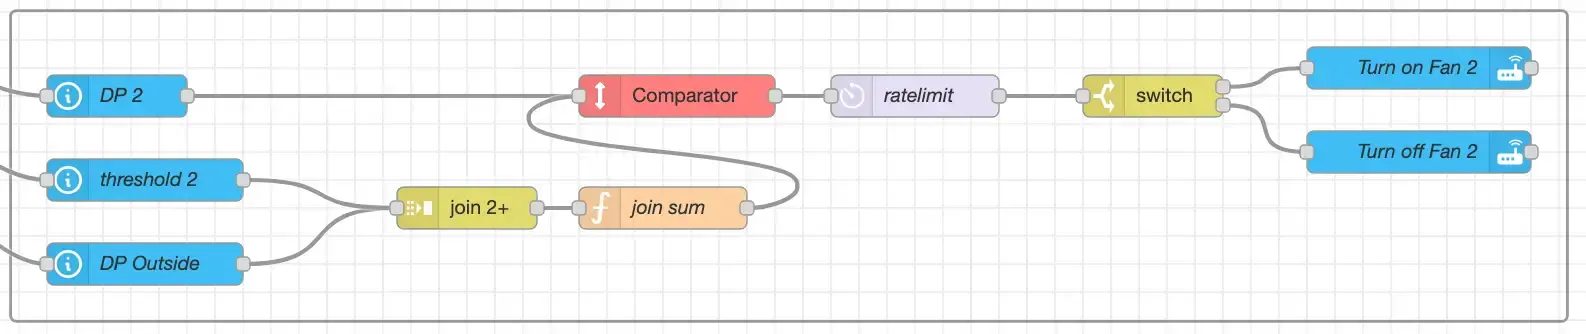
Logik: Wenn dewpoint_inside > dewpoint_outside + threshold → Lüfter EINSCHALTEN. Andernfalls → AUSSCHALTEN.
Verwende dies als Grundbaustein. Dupliziere ihn für jeden Raum und tausche die Entitäten sowie den Schwellenwert-Helfer aus.
Button Override Flow
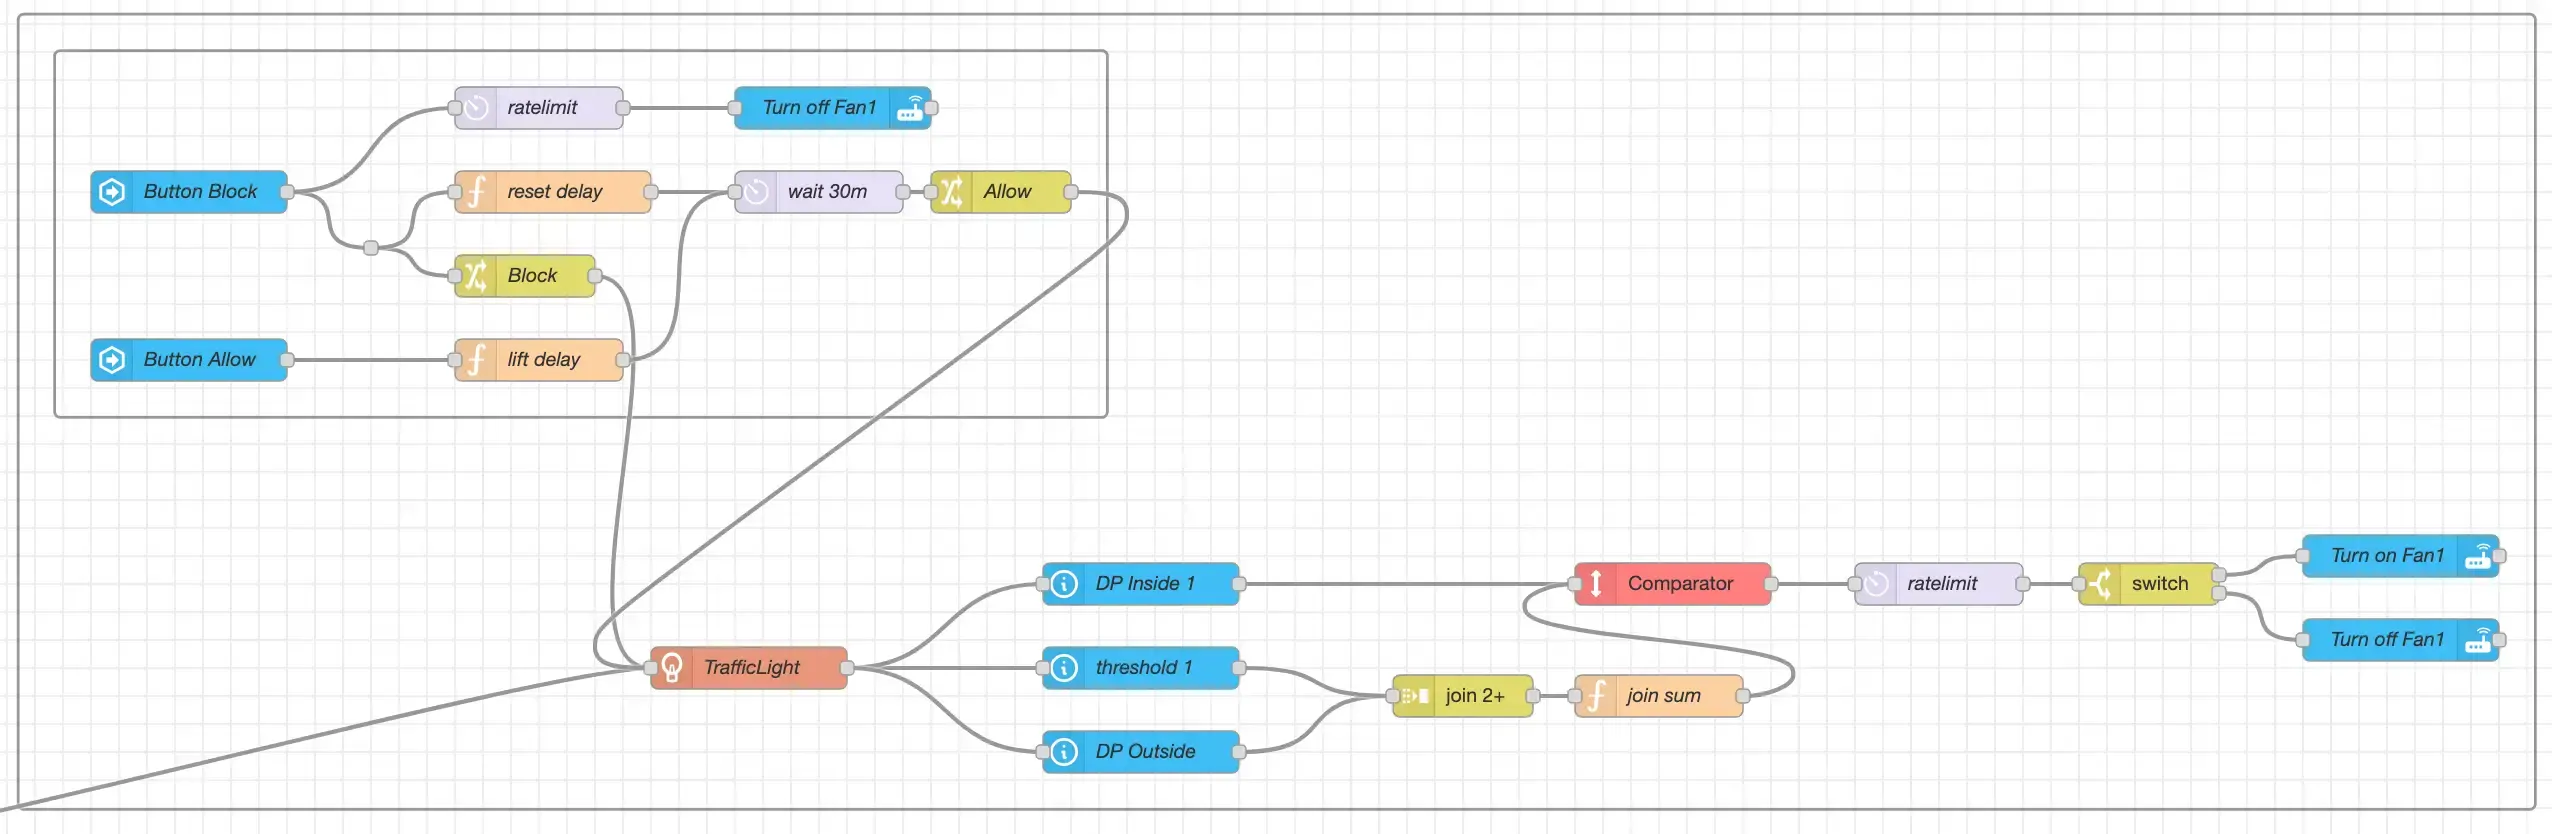
Fügt zwei Schalterbefehle hinzu:
- Pausiere die Lüfterautomatik für 30 Minuten (ändere den Delay Node zur Anpassung)
- Sofortiges Fortsetzen (löscht das Timeout)
Ideal für Meetings, Schlafbereiche oder Waschräume.
Tür-Trigger Flow

Wenn eine überwachte Tür (z. B. Kellerausgang) geöffnet wird, pausieren die Lüfter (verhindert unkontrollierten Luftzug oder Lärm). Nach dem Schließen und dem nächsten Auswertungszyklus wird die Logik automatisch fortgesetzt.
Fazit
Sie verfügen nun über eine skalierbare, energieeffiziente Taupunktbelüftungs-Automatisierung, die auf intelligente Weise die Feuchtigkeit im Innenraum senkt und Schimmel vorbeugt – und das aus weithin verfügbaren Komponenten und offenen Werkzeugen. Erweitern sie beliebig um manuelle Überschreibungen, Anwesenheitssensoren oder Luftqualitätsmetriken, während sich Ihr Smart Home weiterentwickelt.
Solltest du noch Fragen oder Verbesserungsvorschläge haben, kontaktiere mich gerne.

DIY Dew Point Ventilation System
Schritt-für-Schritt-Anleitung zum Aufbau eines automatisierten Taupunkt-Belüftungssystems mit Home Assistant und Node-RED zur Reduzierung der Kellerfeuchtigkeit und Schimmelprävention.

Eclisse Lamp
3D-Animation der Tischleuchte Eclisse von Artemide mit Blender